Redoing the kitchen, and having the renovation spread to incorporate the family room forced us to deal with several issues earlier than I'd planned. They're all small things that take up an incredible amount of time but are important because some of them they carry over to every room in the house.
Lighting... we would like to go with recessed LED lighting in the kitchen, most likely 4 inches so the lights themselves would stand out a bit less. This will probably carry into the family room (easy decision) but of course, how many, where, and how a ceiling fan will be incorporated into this is anyone's guess. It's also looking like the ceiling above the round table in the breakfast area will remain 8 feet high due to the way the roof was designed originally that would be nearly impossible to change. I'm not sure how to handle lighting in that part of the room, and whether it will be on the same switch as general family room lighting is on. Probably so...
The ceiling in the family room is easy. Paneling, painted white in our case, was common in 1959 when the house was built. That's what we'll go with.
The really hard ones to handle are the door hardware and the actual doors. It's hard to find something that looks age-appropriate for the place and at the same time stands out just a bit. Most knobs are round with a round plate behind them regardless of where they are on the niceness scale. After an exhaustive search we were able to find something sort of drum-shaped with a square background that should work for us.
Doors remain a huge challenge. Right now we have two originals that are louvered which I plan on keeping. They do a great job allowing air to flow in and out of closets and the style is ok. For bedrooms and bathrooms though this would be a terrible choice. The only items readily available to us are several hollow core choices that we aren't interested in, and six panel solid core. They look nice but are more conservative than what we're trying to do. I think flat, solid core may also be available at the nearest big box as a special order item but I'm a bit nervous about going with that since I don't know what kind of wood they're finished with and how it would look. There are tons of choices online but they get a bit pricey and last time I counted we need about nine of them. Don't even ask about what we're doing for casing.
This one will take a while to resolve. Of course, I'm cutting in the doorway between the master bedroom and family room today...
Saturday, October 19, 2013
Monday, September 23, 2013
The Kitchen - First Half of September
It's a new month, time for a new project. I haven't removed a (somewhat) load bearing wall before but there's a first time for everything. First things first, the drywall has to go.

And by drywall of course I mean drywall and a bunch of studs. The arched doorway that was put in was easy enough to remove.

Halfway there... by now things were a real mess.


And by drywall of course I mean drywall and a bunch of studs. The arched doorway that was put in was easy enough to remove.

Halfway there... by now things were a real mess.

And, the end result. This is MUCH more open than it once was!

I built a header out of a pair of 2x8s with a piece of 1/2 inch plywood in the middle, glued and screwed together just like the center beams I made are. The beam does not deflect at all and supports the load without any problem. Also in the picture you can see the first small appliance branch circuit on the left side of the room and the outlet for the refrigerator. Before the drywall can go back up the wiring for the oven and steam oven needs to be put in, along with the water supply for a future steam oven when more of them are plumbed in directly and a hole for the drain line. This will make life much easier years from now when the new oven that's yet to be purchased is old and needs to be replaced.
The last thing to finish up before the end of the month was to build the center beam for the kitchen. At this point I have a list of things that have to be accomplished before the subfloor can be permanently installed so I'm trying to work only those items for now.

It took about 6 hours to go from this...

To this. The new beam is in, leveled, shimmed, and blocking and hurricane straps are in. Blocking is much easier to deal with when you fire the nails from the joists into the blocking instead of the other way around.
Next up on the list - wiring, crawlspace cleanup and more...
The Kitchen - Second Half of August
The second half of August brought on new things to do. The joists were done so it was time to stay above ground for a while. It's time to work on the new kitchen circuits. The old wiring was a mess in terms of design and the wire it's made of, and absolutely none of it can be reused.


Boxes going in...

All the sheetrock on this wall had to go. After talking to a few people we decided to try and make the doorway between the kitchen and dining room as wide as possible. After measuring a few things on the model it looks like the widest that's possible is about 6.5 feet. I can always take it in with some additional framing if needed.
The Kitchen - First Half of August
While taking out cabinets I was able to figure out a lot about what all happened in the kitchen and who did it. The original owners only changed out the flooring and put up wallpaper, but the second owner had the kitchen completely remodeled in late summer 1979, about a year after they bought the place. They changed the cabinets out, flooring, pulled some of the paneling, moved the doorway to the kitchen and more.

They also had popcorn put on the ceiling. Popcorn with glitter. The next owner was their daughter. She had the kitchen remodeled again in 2002. The wood colored cabinets were painted white (ugh), ceilings scraped flat, tile put in, and crown molding that made absolutely no sense was put up. Whoever did it had no clue what they were doing. None of the pieces fit together at all, which goes a pretty long way in explaining the square decorative pieces that were put up at every corner. In one corner where they couldn't do that they have 1/2 an inch of caulk to try and fill the gap they left.
By the end of the first week I was moving a little faster again.

With the last of the floor cabinets gone there wasn't much in the way any more.

The wood was less rotten here and more repairs had been done with the subfloor that were next to impossible to take apart so I had to rely on the saws all a lot more.

Finally it was all gone. Just in time for the tree removal crew to stop by and take out the 80 foot tall pine tree that keeps dropping branches on and around the house. After one hit the roof of the garage and I noticed all the repairs from other times the roof has been hit I decided it was time for the tree to go.

According to the rings it was just a bit under 50 years old. I hate to see it go, but it's in a horrible location and a danger to our place and the neighbors.
By the middle of the month the wall cabinets were coming down. These I was able to piece back together, and hopefully Habitat will be able to make use of them.

Here is where the door between the kitchen and dining room originally was. Also, this is the back of the electrical panel. I think the original layout might have had more cabinet space so I'm not exactly sure why it was changed. the arched door was from a kit that someone bought and installed in 1979 when the kitchen and dining room were changed up.
The Kitchen - Week 3
Months ago I spent lots of tine encapsulating the crawlspace but one of the things I didn't do was buy and install a dehumidifier. It took a while to figure out what size was needed, and how it would fit in the crawlspace since it's a bit tight down there. In the end I wound up buying a Santa Fe Force. Here's a shot going in that should give an idea for how hard it is to move around large items down there.


The dehumidifier ran for about a day and a half straight. It was needed pretty badly.
By this point I'd replaced every joist to one wall so now it was time to head the other direction. There were only two joists I could remove before it was time to start dealing with cabinets.

This was taken from the same location I took another picture from with a level and tape measure. The new joist is the same height as the floor was when it was new; the old joist shows that it deflected about an inch and a half over time.

One of the things that caused me a lot of concern was whether the addition was the same height as the original part of the house. This was able to put my mind at ease - the wood in the family room is at the same height as the top of the subfloor in the kitchen in an area where the plywood was replaced. The new flooring will be able to cross the line from the original house to the addition seamlessly.
At this point there was nowhere left to go but to take out the old peninsula. This would have been faster if I realized that I was NOT going to be able to put the old base cabinets back together to donate them to Habitat. These were installed in 1979, and didn't go in the way modern cabinets do. They were built on site.

At least I got to have a better look at some wallpaper.

This is going to take a while...

I wanted to keep the sink and dishwasher around as long as possible so I replaced every joist that was possible until I could work no more and had to remove them.

The dishwasher had no shutoff valve; it was plumbed straight in. This was a horrible idea. Another problem was that it never really worked very well. I blamed the dishwasher, but it turned out there was a ball of solder nearly blocking the water line in. The plumbing in this area was really bad. Someone who knew what they were doing wouldn't have needed to make this much of a mess.

I also got my first look at the color the walls originally were. The wallpaper was added at the same time the flooring was changed out in 1970. Combined with the color the paneling was, and it really didn't look bad when the place was new.
This is where I finished up at the end of July. Unfortunately what took hours to do in San Antonio took weeks to do here.
The Kitchen - Post 2
The first few days of tearing out and rebuilding this part of the kitchen I was able to move pretty fast because there wasn't anything getting in the way like cabinets. I also wanted to move fast to keep the cat from getting under the house again. She come back up later, but it's still annoying. The wires and plumbing made this a pretty delicate area.


I have no idea why this joist was cut. There's no reason for it, and no signs that anything was ever installed here.

It was in pretty bad shape, not at all safe to walk on.


Here's where I ended up at the end of the day. I wanted to build up all the way to the end, but tearing everything out always takes longer than I think it will. I was able to finish up by the end of the next day, then move on to the other side.

A day later everything else was gone. Things were a bit more rotten over here so I was able to move a bit faster.

A few posts ago I put up a picture from underneath the kitchen at a spot where the floor squeaked a bit. The joist at the end that's broken is at that spot. It was weak enough to completely come apart while I took out the tile and subfloor. Its neighbor was also in pretty bad shape. Going underneath the hall and beyond is all new wood from what I can only assume was the termite work the lady behind us mentioned... after we bought the house, that wasn't disclosed. The wiring at the old switch down there that lead to nowhere was still live, by the way.
Due to a really bad schedule at work I wasn't able to get much anything done for about a week, but then I finally was able to finish up this area.

The Kitchen... Demolition
This project started around the beginning of July. I had a pretty solid design for everything and now there's nothing left to do but build the thing. Here are a few last pictures of how the place looked.


It's a lot of pictures, but I learned my lesson last time. Take more before pictures because that means more before + after views. And of course, here's one of the reasons behind starting the kitchen completely over...


Not good. Baseboards come first and we have... paneling! I guess that explains why two walls sound different when you tap on them. Two months later, and I'm still not sure if this is a good thing or not but the door frames were trimmed to fit it so it's staying exactly where it is.

By the end of the fist day, here's where I was... ready for a friend who was laid off to come help a hand with more demolition the next day. By this point, the floor was starting to feel more than a little soft.

Day 2 - July 5... since I had help coming I tried getting as much as possible accomplished. We tore out a LOT of the old floor and even did some work with the joists. Not bad!

This is a familiar sight. Just like the living room, only worse...

The sad thing is, I'm still not sure if this was the worst joist in the room or not. The top fell off when I poked it.

Don't worry, there's still 1/2 an inch of wood supporting the load.

At the end of the day we made a pretty big difference. The beam that ran under the bathroom extended out 5 feet or so into the kitchen so the joists in this area are all short. That saved me from having to dig a couple of footings so I can't complain. My goal was to work through this area as fast as possible because we have to use it anytime someone wants to go in or out of one of the bedrooms.
Friday, August 30, 2013
I know...
It's been too long since I updated this site... I've been hard at work doing all sorts of things in the kitchen, but there has been an incredible amount of research required to make all of this happen. Everything from researching light switches, electrical code, appliances, lighting, pantry door sizes and requirements for the header for the doorway between the kitchen and dining room. And of course, all that research takes a lot of time... as does organizing my pictures and typing up a story here.
I should have the time for an update this weekend - probably sunday / Monday.
I should have the time for an update this weekend - probably sunday / Monday.
Monday, July 29, 2013
Kitchen Planning
It's been about 6 weeks since my last update. That's way too long, and with each passing day it only gets more difficult to write the next post because of all the progress that's taken place.
It seems like half the work here and in the house in San Antonio has been with planning. From moving walls to doing things I've never done before, it all involves research to make sure the end result turns out well and the kitchen design is no exception. I've relied most heavily upon two sources. One is my aunt, the other is Houzz. Both were able to help turn what I thought at first would be a layout where there no possible changes that could make it any better into something 10x more useful.
To do all that I had to make a model, and to build that I had to learn how to make a model. Sketchup makes that easy. Within a couple of hours I was hard at work building the kitchen the way it looks now. Over the next couple of weeks of proposing changes and reviewing input from others I have a finished product.

This is an overview from above the living room. The gray area on the floor is the sectional where it currently sits. You can see the columns that used to be drawn on the wall with tape, the missing wall and how the cabinets will finally be. The arched door in the kitchen will have to move over, but it frees up so much space along the long wall. At the right end there's space for a built in refrigerator. We currently have one around 36 inches wide, but we'll be ready for the next one in the future when it goes out someday. The countertop on the peninsula will wrap down to the floor.
It took a long time to figure out flooring but we'll go with a lighter color of wood. There was no natural dividing line between the family room and kitchen anymore due to the peninsula expanding out to take a bit of space from the eat in area and the only thing that made sense anymore was to have the flooring all the same. that means that this project will force this project to carry into the family room rework so it looks like I won't have a break for a LONG time.

Here you can see how the arched doorway has been moved to the right. I'm not sure if I'll relocate the light switch in the dining room or not. You can also see the pantry at the end of the kitchen that's currently unused. It may have three doors - that is yet to be determined.

This is the view from the entry hall. It'll be great to be able to see past the wall that makes the kitchen so dark now.
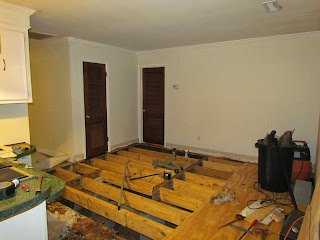
I've been hard at work on joists, just like the bedroom. It's been pretty slow going because the tile is harder to remove than the wood was, and also because the room is in the middle of everything and I can't just turn it into a giant hole.
More to come soon...
It seems like half the work here and in the house in San Antonio has been with planning. From moving walls to doing things I've never done before, it all involves research to make sure the end result turns out well and the kitchen design is no exception. I've relied most heavily upon two sources. One is my aunt, the other is Houzz. Both were able to help turn what I thought at first would be a layout where there no possible changes that could make it any better into something 10x more useful.
To do all that I had to make a model, and to build that I had to learn how to make a model. Sketchup makes that easy. Within a couple of hours I was hard at work building the kitchen the way it looks now. Over the next couple of weeks of proposing changes and reviewing input from others I have a finished product.

This is an overview from above the living room. The gray area on the floor is the sectional where it currently sits. You can see the columns that used to be drawn on the wall with tape, the missing wall and how the cabinets will finally be. The arched door in the kitchen will have to move over, but it frees up so much space along the long wall. At the right end there's space for a built in refrigerator. We currently have one around 36 inches wide, but we'll be ready for the next one in the future when it goes out someday. The countertop on the peninsula will wrap down to the floor.
It took a long time to figure out flooring but we'll go with a lighter color of wood. There was no natural dividing line between the family room and kitchen anymore due to the peninsula expanding out to take a bit of space from the eat in area and the only thing that made sense anymore was to have the flooring all the same. that means that this project will force this project to carry into the family room rework so it looks like I won't have a break for a LONG time.

Here you can see how the arched doorway has been moved to the right. I'm not sure if I'll relocate the light switch in the dining room or not. You can also see the pantry at the end of the kitchen that's currently unused. It may have three doors - that is yet to be determined.

This is the view from the entry hall. It'll be great to be able to see past the wall that makes the kitchen so dark now.
I've been hard at work on joists, just like the bedroom. It's been pretty slow going because the tile is harder to remove than the wood was, and also because the room is in the middle of everything and I can't just turn it into a giant hole.
More to come soon...
Monday, June 10, 2013
Living Room - DONE
It's been WAY too long since the last update. The living room is done now. Here's how it got there.

This is the smaller of the two beams to go in. They're made the same way the others I built last year are - 2x8s with 3/4" plywood in the middle, glued and nailed every 8 inches. The truck bed is still the best work platform out there for making things like this.

It's a lot easier to put in beams when the floor is out. Termite shields went in between the piers and wood. At this point I realized it was getting a lot warmer out, so it was time to finish putting plastic down below the house. The entire ground was covered, along with the side of the crawlspace and the bottom 12-18 inches of up every pier. Then it all had to get taped together and sealed with mastic.

All that was every bit as fun as it sounds. The only interesting thing down there was a tag the phone company put on a cold water line and a scrap of a Korean language newspaper. It's not even that old - someone said it's part of the business section that was printed in 1992.

I have no idea what this says. The previous owner was married to someone from Korea... that's about as interesting as the story gets.

The last thing to do before finishing up the structural work was to put up blocking between the joists and fasten the hurricane/earthquake straps. Blocking made it feel a LOT more solid when I walked around, and real blocking works a lot better than small diagonal strips that I've seen use in other places around here. Don't take shortcuts because you'll notice it.

More hurricane straps...

These things tie in to the rebar that reinforces the piers about a foot deep into the concrete. They're nailed into the joists and help hold the place down. This is the kind of thing that's completely impossible to add unless you're really rebuilding your place.

While I was getting all my tools out from underneath the house I decided to check out a spot underneath the kitchen that squeaks a little when I walk on it. The plywood looks only slightly worse here than it does everywhere else. Pull on the loose pieces and...

It all crumbles into bits. That's the chipboard that someone put down in the late 1970s to put linoleum on top of. This is why I don't recommend the inspector I used - he missed all of this.

Subfloor time! Lowes sells some screws that feed into a framing nailer that made this part of the job MUCH easier. Don't bother drilling and screwing - get these instead. 1/2 inch plywood came out and 3/4 inch is going in so the floor will match up MUCH better with other parts of the house that have been worked on.

I salvaged the original hardwood and it went in back where it was. This was a lot harder than putting in new wood because it warped over time to fit whatever the dips in the flooring, but totally worth it. The long pieces are 10-12 feet long and it's hard to find anything available that size anymore and if you do, you'll pay for it.

I spent a lot of time getting the layout right before nailing anything in. There's no extra wood so there's no room for error. Bits of white paint helped locate where the baseboard and quarter round were.

The original hardwood was made by Harris. They're still around, and they have a distributor in Charleston.

It's red oak, delivered unfinished / clear grade. Neither my dog or the ones anyone had in the past has been able to scratch or dent it. I'd recommend it to anyone. The wood looks damp because there was old, dried mold on the reverse side. I cleaned it with the same bleach solution I used on the center beam. I twisted and broke off all the old nails because they're barbed and will never come out. A bench grinder helped clean up whatever metal was left over, leaving the reverse side perfectly flat.

Another shot of the wood going in... The nailer came from Harbor Freight and worked surprisingly well. For whatever reason it's hard to find a flooring nailer in stock here. Lowes / HD have good ones under $200 but neither have any around and I needed to get the floor in FAST. The only problems I ran into were where I accidentally tried nailing on top of an old nail.
Don't cheap out and use staples. Cleats are much stronger. Even with the rotten joists and subfloor the floor in this room hardly made any noise when someone would walk across it, but other areas that were remodeled only 10 years ago squeak and pop all over the place. They were put in with staples. The ridges on the cleats really help hold everything in place as the seasons change.

Getting closer...

And closer...

I had to switch to manually nailing a few rows before the end, and finish it by face nailing. Everything managed to go in exactly as before and there aren't any big gaps anywhere.

Now that the work is complete the furniture can go back in. We're refinancing so an appraiser will be out to look around sometime later this week. That was the reason behind the big push to finish up ASAP. I put in linoleup in the entry hall. Lowes had a remnant that fit the area pretty well, and now we don't have any construction project going on.
Up next, the a/c leak comes back and we start figuring out what we want for the kitchen...
Subscribe to:
Posts (Atom)