Before I could really get under the house and start digging footings for new piers, it really helps to make a blueprint so you can see how everything is currently built. I always knew there were stairs under the house, but for some reason I thought the inaccessible area near them was much smaller than it really is. Perspective changes when you're under a house I guess. Here's about how everything is currently built. It brings in some new challenges that I wasn't expecting.
For reference, the wide opening at the top of the picture is the entrance from the kitchen to the family room. One square = one foot. The wall by the words "LOAD BEARING" is the one that I filled in after we moved here. Not on the drawing is the deck because that's not really important at this point, and the master bedroom / bathroom on the other side of the load bearing wall. I marked where existing piers are (except for under the load bearing wall since there are plenty of those) and where a beam under the floor currently runs. Joist span is currently about 16 feet in most places.
To start, I plan on adding three piers, shown on the drawing as being in line with each other near the bottom. The extra rectangle is something I forgot to erase, but shows about the line that the next set of piers running to the right under the master bathroom will need to be in. I planned on doing the same in the family room on the other side of the existing beam to cut that span in half, but ran into a bit of a problem.
Yes, those are stairs and a brick wall under the house... or under the living room to be exact. The rough position of all that is on the survey too. Before the room I'm writing this post in was made it was the back yard. There was a deck behind the house; a nice one lined in brick with a concrete top. When the place was added on to the outer layer of brick was knocked out and the concrete was removed to provide room for floor joists, but the rest of the brick, stairs and fill material was left alone. What this means is that I can add a short beam under that half of the family room before I have to stop because there's no more room left to work. The best way around this little problem is to wait until I have the flooring up in the family room, excavate a few inches of fill material and re-pour the top of the concrete slab. Then I'll be able to easily shim between the top of that slab and the bottom of the floor joists to make that half of the room feel a lot more solid than it does now.
So far I've completed one hole for a new footing and half of the second. No small task since I'm digging a hole one foot deep / two feet long/wide, and doing it with a garden trowel. The layers in the soil are kind of cool, except the bottom one has a lot of clay and is harder to dig in. So far I've filled a 36 gallon trash can with dirt, plus some (no we're not throwing it out... gotta put it somewhere until I can decide what to do with it).
And of course, the area under the bedroom and bathroom needs just as much reinforcement as under the family room. What fun.
Sunday, December 18, 2011
Sunday, December 11, 2011
A week of Planning, a Week of Stress
I've been largely unable to physically do anything with the place this week. That's mostly due to the fact that at work I'm in an interim (acting) assignment for a job I'd like to do full time. It's something that works really well with my high energy desire to make things happen quickly. Since it's sort of an audition period I've been spending extra time trying to do my best to get the fill time job, and haven't had much time to devote to things going on over here.
That said, I've still been able to accomplish a little here. One of the biggest challenges we've faced with moving over here is that there's less closet and cabinet space in this house. A lot less. Part of that is due to the fact that most houses of this age just didn't come with much in the way of closets, but it's a problem that was made much worse by the previous owners who felt the need to eliminate the closet entirely from one bedroom and put in pedestal sinks in 2 1/2 bathrooms.
A pedestal sink may be a great choice in a small half-bath. There isn't usually a lot that people want to store in there besides some extra tp and cleaning supplies, but in a second full bath intended for guests/kids to use it makes no sense whatsoever. Here's ours without me going in beforehand to clean up and make the place look nice.
Ignoring the cat on the sink who probably thought I went in there to feed her, you can see exactly what I'm talking about. If we had kids there would be zero room to store anything at all except for where I put the cat supplies on the floor. With a normal sink and countertop there would be a place for the cat to stand and eat besides in the sink (food can't go on the floor because the dog would get it). We would have about four feet of counter and cabinet space to the right and a bit to the left to use. The place wouldn't look like a mess because there would be a place to store pet supplies that we actually use and everything would make a lot more sense.
Tying it all back together now, part of the reason why I've been spending so much time looking for things to get rid of is because there genuinely are a few things that've been forgotten about and moved from one place to the next with us which should go. But also because parts of the house look like a wreck because there's very little room to store things that we genuinely use and need. The problem should be going away pretty soon - there isn't much left to be gone through and things that we have too much of but use (like soap) are used up eventually. And of course the renovations planned will take care of the lack of space, so at some point all will be well in the world again. I'm sure that'll last for a week or two and then kids will come along and I'll get to start all over.
Sunday, December 4, 2011
Too Long Since the Last Post!
A good rule of thumb is, that if a long time goes between posts that's because I'm up to more than I have time to write about and that's certainly the case here!
So what have I been up to... well from looking at the last post anyway, I finished repairing the fence (boring, so no pictures of a fence minus tree here). I finished working on the installing the door/frame/casing to the bathroom and we spent mountains of time just unpacking and basically moving in. I also embarked on a stupid project to strip the paint from the garage doors... it was supposed to just take two, maybe three weekends per door but it turned into an entire learning exercise for what to do and what not to do to remove paint. The results will be wonderful and the other two garage doors will go much more quickly, but the first door took about two months from start to (almost) finished!
We came up with some great ideas for the kitchen redesign, and I was able to firm up a design for all the stiffening that I'd like to do to the foundation. I want to add four beams to cut the span of every floor joist in half. Along with this will come adding a number of piers, but it should make a huge impact on how solid the place feels. I also would've had some work to do in the kitchen in order to build it up to take stone flooring, and I might as well carry that over to the rest of the house. All that will need to be done before I can do any part of the rebuild phase of the kitchen/living room remodel.
And the last thing that we finished is making the address marker for the front of the house. Numbers are the same as DWR sells, since they changed them over to being made from aluminum vs. stainless steel. Where they came from, I'll never tell.
One more thing came along... since I don't have enough to do at this house already, and I have way too much time on my hands we are getting ready to close on a second house. This one will be a rental downtown. It's a craftsman built sometime around 1920. I like originality - it's not a post-modern mass-produced knockoff of a craftsman. It's the real thing, with tons of original character from the wood floor to the doors and hardware. The plan is not to completely redo this place. For now I'm planning on cleaning up, doing a bit of landscaping, getting new fixtures and blinds, and expanding the bathroom into an oddly-shaped hall closet. Kitchen rework, a bit of leveling and stripping paint will come at a later date. We'd like to have it no the market by February 1 (hint, hint for anyone who wants to live in Hampton Park Terrace...).
Here's how the bathroom door came out. Exciting stuff, I know... I experimented with building without casing this time around, just to see what all it takes. It was surprisingly simple - I just built a filler panel to go in the space above the door, and on the left/right sides it was a pretty good fit from the beginning and caulk was all that was needed to fill the gap. The master bedroom is now blue, just like our last house was. MUCH better than the horrible shade of purple that everything was beforehand. I'm probably going to replace all the doors when we really start redoing the place, but it's good to pick up a new skill here and there in the meantime.
Our second oldest project sounds so simple... just get numbers on the house so people can actually find it. Our address is a little strange compared to the houses around us, possibly because the people who built our house in 1959 are the ones who planned and built a lot of the others in the area. The lot is about twice the size as most of the others, but it's an older neighborhood and they vary a lot from one to the next. I couldn't just put the numbers on the house itself because they would blend in too much, so I built something that looked correct for the age of the place. The wood had to be cut, drilled, corners cut, edges beveled, and painted three times but the result is pretty nice.
Here's a picture from when I was almost done with the garage door. What I learned about removing paint... first off, don't bother with paint stripper if you have more than one coat to deal with. It can, however take care of two coats if they're thin. Work with a small area at a time, and don't let the stuff dry. The overwhelming majority of the doors were done with a heat gun since there were at least three coats everywhere except for the top panel with the windows. Since the wood wasn't varnished before it was primed, areas where paint was removed came out a grayish-white so everything had to be sanded. A quarter sheet palm sander sped this up and I'd have probably given up without it. That left behind the bare oak frame and cedar panels. I plan on going over it once more with fine sandpaper, and coating the whole thing with several coats of marine spar varnish to finish it off. That should leave the natural colors of the wood protected, and hopefully the only maintenance will be to add more every few years. The plan for working the other garage doors is to go just one section at a time instead of doing the entire thing at once.
Below is the rental house as it looks right now. Sometime next year it'll get painted. I'm not sure of what colors yet though. The part of President St that it's on is at the southern-most end of Hampton Park Terrace. When the national register surveyed the area some time back it was included in the neighborhood but since then that block fell off. I think it's an oversight since this block is on all the original surveys, and the legal description is something like Lot 1 as Surveyed by Hampton Park Terrace, Inc. / 1916, 1919. I'll deal with that more after I'm finished painting since I have a feeling that's a lot easier now than once it's re-added to a historic area.
A simple shot of the first floor, with the angle carefully chosen to keep the fireplace with a huge, ugly 1970s gas furnace that vents into the chimney out of the shot. Downstairs has two living areas (shown), a dining room through the french doors to the left and a kitchen. Upstairs has three bedrooms, a bathroom and linen closet. I think it's about 1,500 square feet. Anything made of wood besides the floor is covered with layer after layer of paint. I'm not really sure how to remove it from the french doors since heat guns and glass don't get along well.
So what's coming up next... for now I'm cleaning up the other house and that'll hopefully be complete in about a month and a half. Over here the next steps are to varnish the garage door, finish unpacking and moving in, add the two beams under the living room and master bedroom, and firm up the details about the kitchen renovation. We have a general layout figured out, but are unsure about some pretty important details. Mainly, what kind of appliances would we like, what type of cabinets, island/no island, flooring, and colors. The most logical order to go in is to demo the entry and living room first, add the beam under there and do subfloor repairs/strengthening, refinish and reinstall the wood flooring in there, demo the kitchen, do the other beam and subfloor work, then call a foundation company to level and re-shim the whole house. Then we can start reinstalling things in the kitchen. The subfloor and leveling stuff really holds up the kitchen work since that would surely damage whatever flooring we decide to use if we go in another order.
Lucky thing we're still in the planning phase, I guess...
Tuesday, August 30, 2011
Update... It's Been a While
I've been pretty busy over the last month or so. Between work and unpacking it seems like there was hardly time to get anything done. The F-100 also arrived along with plenty of things the car shippers broke on their way over here.
What I did manage to take care of though, was painting the room with the world's ugliest light (100% plastic, by the way) along with a few other things. Now it's the same color as the other rooms in the front of the house - here's what it was like beforehand. I'd like to say that I'm holding off on getting pictures of how it came out for a good reason, but really it's because some things that I'm donating are in there at the moment.
I also managed to install a door between the master bedroom and bathroom (finally!). Somehow I was lucky enough to wind up with a door that perfectly matched the original ones in the house, and that was the right size for the doorway that was empty. I built and installed my own door frame. It takes longer than putting up a prehung one, but it comes out the way it should.
I still need to finish the casing, caulk and paint it, and trim the tiles that had to come out. That'll probably happen this weekend. Sometime soon I plan on stripping the old white paint and staining the door somewhere between light brown and tan. I've also been getting ideas for what kind of hardware would work out here but like a lot of things, it's still just an idea at this point.
Right now I'm most of the way through painting the master bedroom. Here are a couple of before pictures.
Like I said, we're still moving in and unpacking... I'll finish up on Thursday unless something unexpected happens, like another tree falling down from a neighbor's yard and breaking the fence.
Monday, July 4, 2011
Quick Update...
I'm finally finished building the wall to get rid of the old tv hole. Actually I finished about 3 weeks ago, but still needed to install the tv antenna in the attic, so there was a set of rabbit ears on the tv and that's not very nice to look at... anyway I finished that last weekend, spent a few days decorating and cleaning up, so here we are today.
This weekend I also finished painting in the kitchen. The way we've been working is that once a room is painted and everything unboxed, nobody can make a huge mess in there anymore. It seems to be working out pretty well, but the kitchen has been a pretty popular place to leave things so keeping this room organized will take a bit more effort.
Our plans right now are to continue unboxing things room by room, getting rid of the carpet in the den and putting something in its place that'll do for now, and installing a door between the master bedroom and bathroom. There'll be a how to on that part at least, and plenty of pictures of other parts of the house. We've been hard at work every day, but updates about unboxing things wouldn't be very exciting to read so I've kept that off of here.
Saturday, June 4, 2011
Tuesday, May 31, 2011
Memorial Day
I've been really busy over the last week or so... of course that makes it even more difficult to update this because there's more to write about.
I finished painting the front rooms of the house, but haven't put up pictures or anything yet. I'm not quite sure this is where I want to place the sofa but it'll probably stay there.
It came out pretty well - the color matches the white / green in the pillows. I'm still not sure what to do with the windows but I'm not in any hurry.
As usual, the green color of the sofa doesn't come out. You'll have to use your imagination here.
I had to take a couple of days off to clean up and do other things...
I've spent the last few days working on enclosing the tv hole. The project started off small, but it keeps on growing. I wasn't going to add a door, but I had to take the trim and all the drywall off anyway and it's easier to do now while everything is apart. Since I was building a wall it wound up being a great opportunity to move an outlet out of what's becoming a closet and into the living room. I also fixed the bad job the previous owners did of installing the speaker wires.
Before
It took a lot longer to remove everything than I thought it would. All the corner pieces added a lot of work, and I had to cut the floor by hand.
Finished removing things, now it's time to build.
Drywall going up...
How it looks right now.
I'd normally write up a bit on how to frame and hang drywall, but there are guides all over for doing that. One thing I don't see a lot of are opinions on installing doors. This time I went with a prehung door from Lowes. These are split jamb doors and both sides of the doorway sort of come together as mating pieces. I found it far more difficult than doing it the traditional way, putting in the jamb in one piece, then hanging the door and installing the casing. The pieces are too big and awkward to manage very well on your own, and that slows everything down.
Anyway this week I'm going to finish sanding the drywall, prime and paint the entire room (of course, thanks go out to my wife who was essential in picking the best paint color). With any luck we'll be done in here by the weekend and then I can move on to a few more annoying things around the house after we finish unpacking from the move.
I finished painting the front rooms of the house, but haven't put up pictures or anything yet. I'm not quite sure this is where I want to place the sofa but it'll probably stay there.
It came out pretty well - the color matches the white / green in the pillows. I'm still not sure what to do with the windows but I'm not in any hurry.
As usual, the green color of the sofa doesn't come out. You'll have to use your imagination here.
I had to take a couple of days off to clean up and do other things...
I've spent the last few days working on enclosing the tv hole. The project started off small, but it keeps on growing. I wasn't going to add a door, but I had to take the trim and all the drywall off anyway and it's easier to do now while everything is apart. Since I was building a wall it wound up being a great opportunity to move an outlet out of what's becoming a closet and into the living room. I also fixed the bad job the previous owners did of installing the speaker wires.
Before
It took a lot longer to remove everything than I thought it would. All the corner pieces added a lot of work, and I had to cut the floor by hand.
Finished removing things, now it's time to build.
Drywall going up...
How it looks right now.
I'd normally write up a bit on how to frame and hang drywall, but there are guides all over for doing that. One thing I don't see a lot of are opinions on installing doors. This time I went with a prehung door from Lowes. These are split jamb doors and both sides of the doorway sort of come together as mating pieces. I found it far more difficult than doing it the traditional way, putting in the jamb in one piece, then hanging the door and installing the casing. The pieces are too big and awkward to manage very well on your own, and that slows everything down.
Anyway this week I'm going to finish sanding the drywall, prime and paint the entire room (of course, thanks go out to my wife who was essential in picking the best paint color). With any luck we'll be done in here by the weekend and then I can move on to a few more annoying things around the house after we finish unpacking from the move.
Wednesday, May 18, 2011
Pictures of the Mess
Now for a few pictures of what I've been up to...
It's all kind of small stuff so far. When I moved in the doorbell was missing and a cheezy sounding wireless one was in its place. Those didn't exist in 1959 so there had to be something going on here... I dug through a pretty solid plug of painter's putty to find a hole but only one wire was barely visible in there. I guess the old button broke and they lost the wires somehow, and decided this was easier than running wires back down the hole to where they belong.
They were right about which would be easier... I had to pull off the trim and a couple of small pieces of siding to feed the wires back down.
I also discovered that somebody went to a lot of trouble to remove the porch light and make it look like nothing was ever there. I came across the wires in the attic just sitting there with the ends exposed when I was digging through some insulation. It's always nice when someone just leaves something like that there waiting for you.
I've also spent a lot of time painting. That's really gone far in terms of making the place smell better, because the walls picked up the dog/scented candle to cover up the dog aroma parts of the place had. Not to mention that it looks better.
One last look at the dirty tan colored walls.
Looking much better
Ready for paint. I started to paint this room the same shade of blue the master bedroom in the old place had, but it really wasn't coming out so I called it off. The new plan is to go for the same color that some of the leaves in the upholstery have... kind of a sort of off white. We'll see how that works out.
The family room is getting closer to being ready for paint. This room will be a blue that matches with what's in the rug. I'm not painting this room until the old tv hole is walled off, but I'm painting the entry way / living room before I do that just to keep the chaos limited to one area.
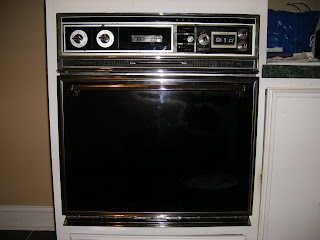
The last thing I've been working on is the oven. It was pretty bad. I'm really not sure if it's ever been cleaned or if it's only been so long ago that it really doesn't matter. So far I've only cleaned the door and that took hours! I took the glass panel off the front and broke the door all the way down. Even between the glass and the metal behind it there was a ton of grease. Enough to eat through the paint on the metal completely!
Here's how the front looks now.
And the inside. It's pretty clear I have a lot of work still to go.
That's pretty much where the place is now. I'm continuing with the inside of the oven, unpacking, painting the front rooms and then working on enclosing the tv hole. I want to be finished with at least a couple of these things before the weekend is out.
Tuesday, May 17, 2011
cleaning and unpacking - what fun
WOW it's been too long since I've updated this... Only yesterday we got internet service set up so I've been doing these and basically anything online from a coffee shop down the street. And of course it's late, so pictures will have to come sometime tomorrow.
So on to progress. The floors are clean anyway, and everything else like showers and other stuff you use on a daily basis. At this point we're still solidly in the first part of the project - sort of getting the place more liveable so we can kind of get a feel for the house and what would work out best. I've also been spending a huge amount of time unpacking and writing up the claim for damaged and lost items.
The walls were way beyond cleaning so we've been priming all of them. So far the entry way, most of the kitchen, living room and family room are some shade of white. The dark purple is taking two coats to hide of course, and there's loads of damage to the walls to repair. The family room will be a shade of blue that works with the rug... while the entry, dining, living room and kitchen will be some kind of off white that matches the upholstery on the couch. Neither of these two colors have been figured out yet.
I've also been playing around with the oven. It smells bad when it's turned on because it's probably never been cleaned, so right now it's in a half-assembled state on the kitchen floor. Sad thing is, that's just the door. Scrubbing it led to wanting to get out a lot of nastiness behind the glass, which led to the paint behind the glass coming off because it was no good anymore and now the door is taken apart so it can be cleaned and repaired completely. With any luck it'll be back together tomorrow. It's probably more effort than anyone else has put into a 35 year old Jenn Air but at least it won't be a huge filthy thing in the center of the kitchen.
Future plans are starting to form. I'm thinking bigger/more windows, and maybe a vaulted ceiling in the den (but something would have to be done with the fireplace). Not sure, but I still have plenty of time.
Thursday, May 5, 2011
Done Cleaning (Almost)
First off - sorry I haven't responded to comments yet. For some reason my work computer doesn't work very well with however they're set up on this site. Anyway on to the pics...
Like I said earlier, before and after pics of dirty vs clean are hard to take. Here are a few attempts anyway.
My first project will be to make this room some color that's NOT purple. Nothing against Barney or the high school I went to, but it's a terrible color to paint a room. This is the TV hole I'm enclosing. It'll become a regular closet after I'm done. The hole works great if you happen to have a tv that exact same size. Of course nobody but the previous owners do.
The main bedroom came out pretty clean. The bathroom took extra scrubbing though.
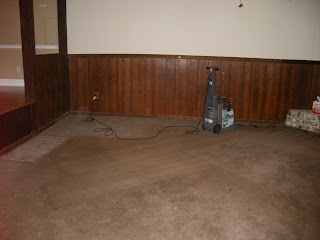
The den is taking a lot of extra work. I know the carpet isn't something that we'll keep. But I'm not ready to work on this room yet. On the other hand the room smells horribly like dogs. Two of them used to use this room as their highway to the back yard (dog doors). Last night I got a carpet cleaner from Lowes and used it once. It made a huge difference but the smell isn't completely gone. However you have to be in the room, and it's a lot lighter now. The carpet also came out a different color so that's a nice bonus. I'm going to run it again this afternoon and in the evening before returning it.
I decided not to post the pic showing the fireplace to the right with all the dog fur everywhere.
This is how it looks right now. Lots cleaner but there's still more work to do. For now I'm waiting on the movers to show up so all our stuff will finally be here. At least I made the goal of having clean floors before furniture is in. Next up will be painting (everywhere) and enclosing the TV hole.
I'm still figuring out what to do with the strange molding and baseboards. It really doesn't go with anything we own, or the house at all but I may leave it up for a while just to speed up painting the place. It needs to be done badly, and I'd rather get all the rooms a decent color and then worry about what to replace it with and how to take it down. Really the worst part are the corner pieces so I may try and match the crown molding that went up and splice in new pieces there.
More to come soon!
Saturday, April 30, 2011
First Post!
If you haven't guessed yet, this is yet another home renovation blog. My last one was http://deerfieldwood.blogspot.com This time I'm in Charleston, SC and the house is a lot older. So the details...
Year Built: 1959
How Many Owners: I'm at least the fourth... no real idea
Size: Entirely too big. 4 bedrooms/3.5 baths.
Architecture: The building itself is pretty much a ranch. The inside... trying to be a half dozen things and succeeding at none.
Lot: About .4 acres, maybe more.
Without getting into too much drama, it's a short sale. I promise the only thing I'll say about that is never, NEVER BUY A SHORT SALE! Save yourself the trouble and don't do it!!!
So the condition that it's in now... nasty. The previous owners weren't into the whole "cleaning" thing and owned two large dogs. Housebroken but big, smelly dogs. They also switched out fixtures before closing and took things that were included on the listing. Did I forget to mention that they were going to get foreclosed on soon? I'd have been a lot more mad if I wasn't going to renovate the whole place, but that's seriously low rent behavior. Stay classy, Charleston...
(ok, taking down the drapes was my doing)
Original wallpaper in the back of the kitchen cabinets.
Right now I'm spending all of my time cleaning. I've never been this completely overwhelmed with cleaning a place before. It's not so obviously dirty to the naked eye but rest assured that everything needs cleaning. Touch a doorknob or countertop and your hands get nasty pretty quick. I'm starting in a room that used to be the master bedroom because it's seen the least amount of traffic in recent times. After some time on my hands and knees with a scrub brush and some simple green I have a room that's clean enough to lay down an air mattress and sleep in.
I think the bathroom was pink and gray once upon a time because the casing was originally the same shade of gray that I've seen in other bathrooms with that color scheme. What was probably well-installed original tile has been replaced with white on the floor and shower, put down by someone who doesn't know to go in a straight line. It seems good from a distance but when you're in there you can tell that everything is off. They also didn't put in the drain to the sink right and tried covering it up with plumber's putty, and lots of it.
More to come soon...
Subscribe to:
Posts (Atom)