Tuesday, October 23, 2012

Upcoming Plans - This Place and More!

I haven't wasted any time on getting started with the next small project around the house. It's nothing too exciting - last fall sometime I started stripping the paint from the left garage door and eventually finished it this spring or early summer. Now I'm working on the middle door. It's moving along much faster thanks to everything I learned with the last one. I'm also working on one panel at a time instead of trying to do it all at once.

This Friday we close on another rental house downtown. This one is not in a historic area but was also built sometime around 1920... my guess is no earlier than 1915 / no later than 1925. Based on the neighboring houses, it looks like one of many George Trescott built (his foursquare pattern like the one on President St is easier for me to spot) and he was active in the Rose Garden area this one is in. For whatever reason I never bothered to take a good picture from the street so these will have to do until Friday.

Here's the front porch, including a visitor who decided to come along to the inspection. It's pretty typical of bungalows in the area.


This is the living room - immediately to the left when you enter. I'll most likely change out the light above the fireplace but leave the fan alone for now.


The dining room - also with a fixture that will probably be changed out soon. The flag does not convey.


The kitchen. Small, but most importantly it's already been redone so I don't need to do much here beyond cleaning up.


The bathroom. To the left is a space for a stacking washer / dryer. They're all over Craigslist so it shouldn't be difficult to find one.


Facing the rear of the house from the deck. Nothing too exciting.


The back yard is surprisingly large for such a tiny (.08 ac?) lot.


The side of the house... nothing exciting going on here either.


Sunday, October 21, 2012

Foundation - DONE!

It's been too long since I posted anything, but I've been busy.

Over the last couple of weeks I finally raised beams #2 and 3 into place, which means that the foundation in the 2002 addition of the house is finally reinforced. It's nice to not have to crawl around underneath the place for a change. That means that I'm ready to move on to a lot of other activities now.

I was originally going to move straight into redoing the living room and kitchen and then progress on to a couple of smaller things, but I learned something this summer. It's hot here. Really, REALLY hot. Outdoor activities like pulling out the endless number of weeds from the landscaping near the house and doing anything that involves movement is horrible. If I start on the living room and kitchen now I'll wrap up just in time to start the outdoor stuff in the hottest time of the year. Instead, I'm going to paint the house, take care of the landscaping and the other two garage doors before working indoors.

What this really means is that I'll be working on this stuff off and on for maybe 2-3 months if I take my time. It may not be the most interesting stuff to post about, but it's better than occasional updates with pictures that look like I took them from inside a cave. Speaking of, here are a few from the foundation work.

The red is from a marker - not because something bad happened.

The bottom of the joists aren't all even with each other, probably due to the moisture that built up from the insulation that's now gone. They're cupped slightly and I made shims to take up the difference between them.

This is the third beam in place. The sad thing about all of this is that I didn't use a drop light until the very end. I was just carrying a small flashlight with me. I also did all the nailing by hand, except on the last beam when I bought a framing nailer. I'll get loads of use out of that when we start moving walls around.

Monday, September 3, 2012

Slow Progress

Something I've never really taken into account when working on a house is the time of year. It's really never caused me any trouble in the past, but I've been lucky enough to do big outdoor projects between November and January, or the project has been small enough to fit in a weekend from start to finish. That was until we moved here and bought a house that needed structural work before I could really proceed with tearing rooms apart and rebuilding them. My luck would've continued if I was able to start and finish the rental house as fast as I had originally planned (ha!)...

So here I am in early September, still working on the foundation. There have been a few other setbacks... mostly helping someone look for work and dealing with some small things that came up around the house but now I'm back at it when ever I can. At this point, to put up the second beam I need to pour the last footing, build one pier and then put the beam together. Not bad. But for the 3rd beam, all I've done is measure and mark where it should go. That's a nice way of saying, I still have a lot of work yet to go and it's hot outside (and under the house). I'll consider myself lucky if I'm finished with this stuff by the end of the month.

Once all that is done I'll enlist the help of a designer to help us figure out the kitchen layout, and bounce a couple of ideas off of them about the entry area and living room. Once I have a better idea of what the end result is supposed to be I'll be able to really get to work and move a lot faster. It'll also make this site loads more interesting.

To make up for the lack of updates, here's a bit of what I've been up to...


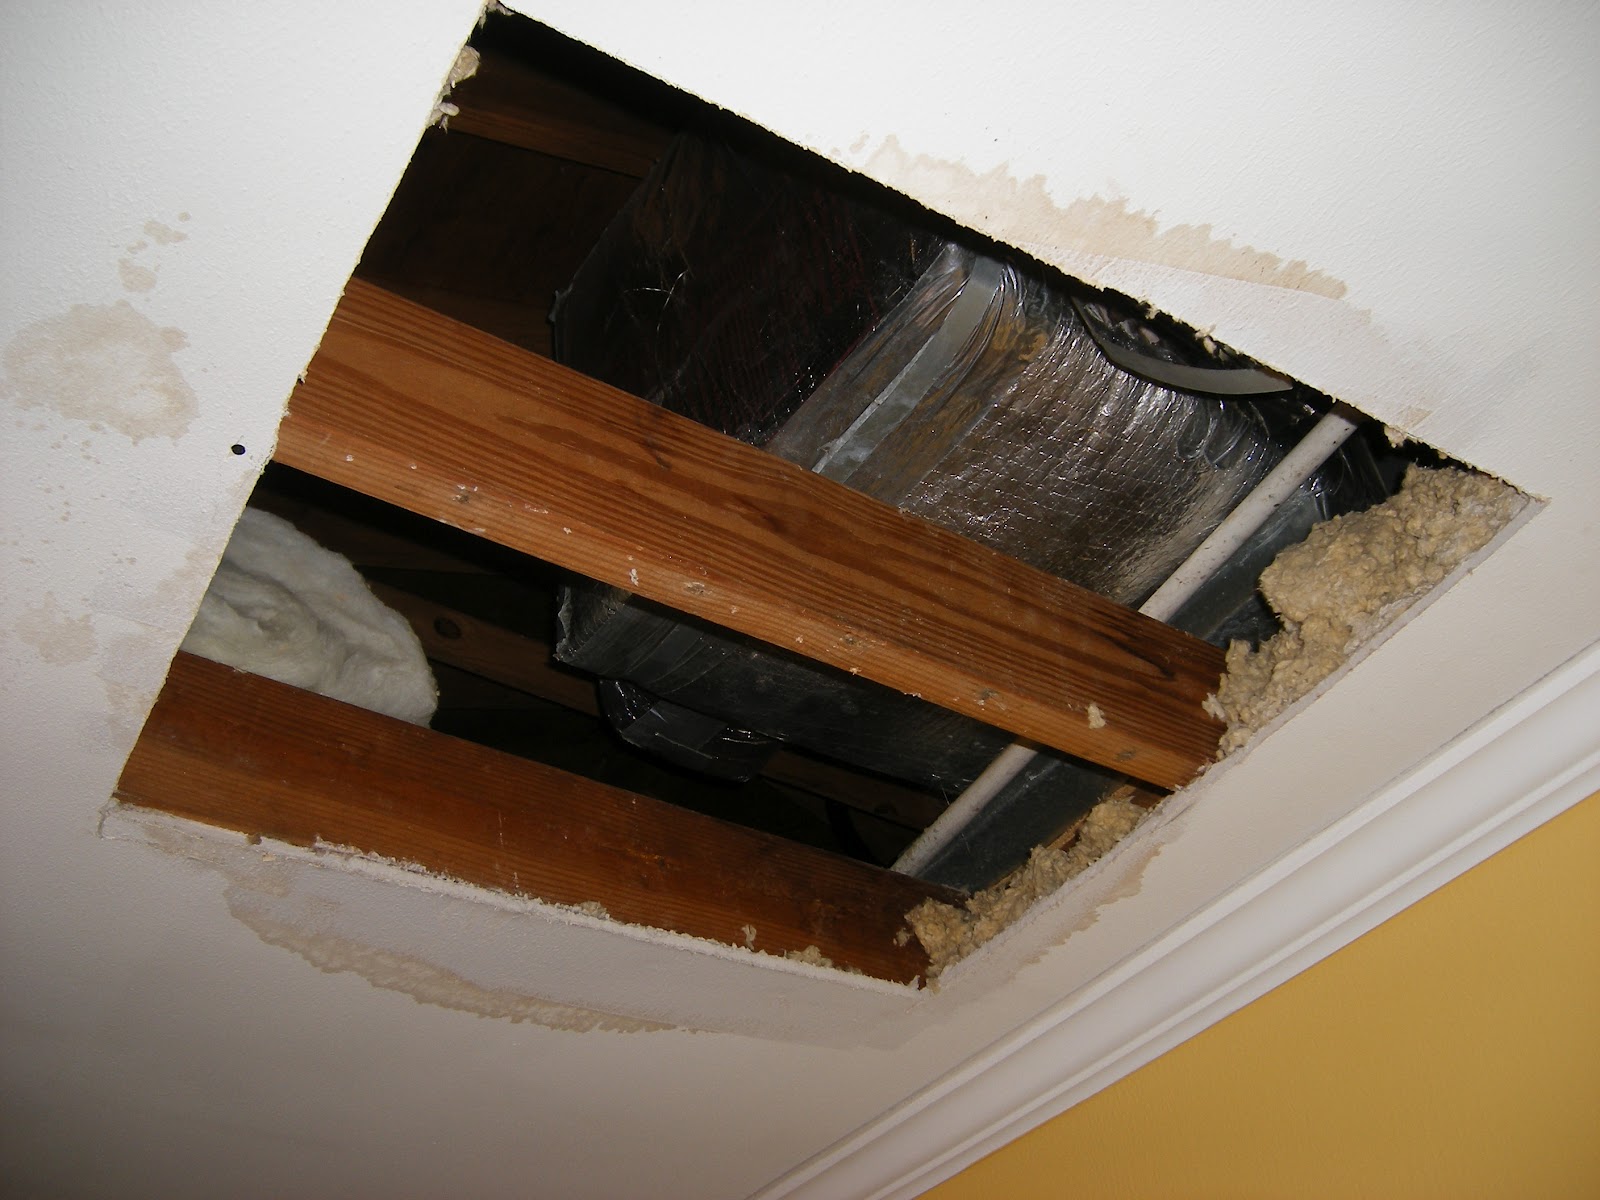
Your day is never going well when you look up and see this in a bedroom. I finally repaired the stained and low area where the ac drain leaked all over everything.


30 minutes later it looked like this. Not a bad way to end the evening, but only a couple of days before someone was coming over to visit and they needed to stay in that room.


This is the texture I had to match. I think it was added around 1970... it's present in some rooms and not in others, and sometimes on the ceiling. Everything came out ok.


And of course a few days later the other air conditioner decided to leak all over the place. This time I knew what was happening and took care of everything before there was permanent damage to the ceiling in the living room.


Back to the foundation... this is what it looks like heading in. Bug killer is a must... just in case.


I like seeing these. This is a completed hole for a footing, ready for concrete and rebar. Each hole is 2 feet wide/long and a little over a foot deep.


This is where the next beam is going - under the main bedroom. There really isn't anything interesting in this area aside from a couple of pipes that will need to move a bit to allow for the beam. For some reason there was 30 cents down there, and a piece of the original bathroom tile from the old main bedroom. Whatever.


This is looking into the nothingness below the original part of the house. I can really see over there what the insulation did to the subfloor over the years. Hanging fiberglass insulation below the floor might have been good for energy savings, but it was terrible for the wood the house is made of.. In a humid area like it is here it really should be banned in favor of a conditioned crawl, no insulation down there at all or an extreme amount of ventilation to keep the area dry. Every new house, and older one in the area where insulation was retrofit like this will run into the same problem. In the older areas I can see where moisture caused the plywood to delaminate. Good thing I was already planning on replacing the subfloor throughout the house, I guess.

Tuesday, July 10, 2012

It's been a while since the last update, but I wanted to wait until there was actual progress to write about. I've been working mostly on the foundation over the last month. It hasn't been an all day / every day thing, but something I've devoted maybe 1/4 of my free time towards. I might be more motivated, but at this point the heat index has been over 125 degrees more days than I can count and I don't really enjoy being outdoors when it's that bad out.

This is the start to a pretty normal day of pouring footings. For some reason I thought I was going to be able to haul all those cinderblocks under the house to where they belong. That's one of those things that didn't happen... I also ended up using another 7 bags of concrete that day. It takes a lot of the stuff to fill holes that are 1 foot deep x 2 feet wide.


Here's the work environment. Not a fun place to be, but at least there are no bugs.

I didn't take any more pictures after pouring concrete all day. For some reason my motivation to do that kind of thing disappears when it's hot out, and when I manage to somehow get a sunburn while working under the house. Although, I dd discover that it's not that uncomfortable under there when you have a fan pointed at you.

The last few pictures are from this last weekend, and the rest from today. This is where I cut everything and pre-assemble the beams. They're made from two 2x8 layers with 3/4" plywood in the middle. Everything is glued and screwed together. The only problem with that is the weight... the first beam is 13 feet long and there's no way I could move something that heavy on my own - especially under the house.


The way around that was to make tooling holes, and hold the beams together with some long bolts I have. It's also important to remember which way everything goes back together so it was all marked before being taken apart. I put a link to this site on both ends of the beam. Who knows - maybe it'll be of interest to someone later.


I don't have any pictures of the beam going together because I was more concerned with building and raising it than anything else. Here's how the first one came out though. 


A three ton truck / SUV jack works great for lifting the thing and getting it in place. At this point everything is as level as the joists allow and the floor in this area is MUCH more solid. It feels loads better and I really can't wait to get the second footer and pier finished so I can put that one up too. Then there will only be one more beam left to be built while underneath the house.


I can't make it run the width of the living room because the old patio is still there (sort of). That'll need to be broken out because airflow under there is really bad. The joists are in bad shape over there and the only way to make things right is to get that brick and fill out of here. Think: 2013 here...


The next update will hopefully have pictures of the second beam in. One of the in-laws is coming over in less than a month and there are a lot of other things that need to be finished first though...

Sunday, June 17, 2012

Slow Going

I've been back at it with the foundation for a while now, but had to take a break due to weather. It rained pretty much every day for a good week or so, and that's not very conducive towards bringing a half ton of concrete back from Lowes / HD in the back of my truck. The weather has improved though, and today I'll be back at it. If I can dig the last (small) hole for footing #4 on the first beam, pour it and pour footing #1 I'll consider today a tremendous success.

For those keeping count, on top of what I mentioned above that leaves me with four footings to dig underneath the bedroom, one additional small one to dig under the living room, and eight to pour. Four of them will be relatively easy, but the four under the bedroom will be harder because it's much farther to go between the opening to get under the house to where the concrete is needed. I've been using a skateboard to help carry dirt out and concrete back in, one bucket at a time.This has been a bad combination of slow, tiring, and not very rewarding.

Here are a few pictures of how the garage door came out, and the foundation work is going.


One down, two to go!


Here is my home for probably the next month or so. This picture is taken from the entrance to the underground crawlspace.


For any prospective landlords out there, we're about a month into looking for renters and today will make the third time I've had to drag a lawn mower over there to cut the grass. Someday hopefully it'll be someone else that gets to do that but you have to start somewhere.

Since I can never have too many things to play around with, here's our latest addition - a 1987 Mercedes 560SL. It runs and drives great - the big thing it's lacking is working a/c.


Yes, that is tape on the seat bottom (courtesy of the PO). This afternoon I'm buying some fabric to make my own seat bottom covers. I'm planning on working on the house for another week+ and then giving a couple of days to the car. It's pretty fun to drive, for something with an automatic. I'm amazed how well the colors in the interior have held up over the years.

Thursday, May 24, 2012

Back at it...

Once upon a time this blog was about a different house... one that I live in. Then in December everything went crazy when I bought another place to fix up and keep as a rental. I think I've posted more about the other place than the one this site is supposed to be about. I finally finished up with the other house and have been able to get back to work here.

I'm trying to pick up where I left off - basically just finishing things I started. By my count, that's moving in stuff (unpacking, organizing, donating), the garage door that I stripped the paint from, and the foundation work. Once that is finished I'll be able to move on to new endeavors; mainly renovating the living room/entry/kitchen. I'll admit, the delays haven't been entirely bad. We've been able to put a lot more thought into what we'd like the kitchen to actually look like. Anyway, on with the updates...

The garage is where all the organizing and donating has been going on. A few days ago it looked like this.


The empty space to the left of the truck pretty much shows the outline of where Danielle's car goes. Now it looks a lot more like this:


There are still a few more things to take care of, but overall it's a HUGE improvement. Of course, part of the open space will be taken up (temporarily) by Mt Cinderblock pretty soon. Some of the cinderblocks will go underneath the house as they get used, but the rest need to hang out somewhere. I'm getting tired of parking outside so this will probably happen sometime next week.

This afternoon / evening I finally restarted work on that garage door I stripped the paint from. Being exposed to the elements for six months beat on the wood but it's nothing sanding it couldn't take care of. I plan on finishing the rest of this door tomorrow. I"m not sure if the color will lighten a bit or not, but the finish will shine less. I used satin finish marine spar varnish, but it was still wet in this picture.


And in case anyone was wondering how landscaping at the rental house came out, here's what it looked like before / after. 


It's hard to tell, but in the 3rd picture you can see the bricks I added to fill in what was missing between the ground and the house. All plants are perennials, so we'll see how long they last. They were pretty healthy looking last time I looked at them a few days ago. Hope they're still in good shape next time I go over there to cut the grass on Saturday.

Sunday, April 29, 2012

Another Nameless Update

I've been busy, so here's an almost pictures only update. Things I still need to do at the other house...

Indoors:
- Quarter round trim in the laundry room.
- Whatever other cleaning up I find I missed and feel like doing

Outdoors:
- Landscaping in the front yard (3 small bushes)
- Replace some missing bricks between the bottom of the house and the ground

Also... get someone to replace the broken a/c. Of course the outdoor unit is at the end of its life, but the indoors part is in great shape. Too bad they don't make R-22 air conditioners anymore or I'd be able to reuse it and replace only the outside part. I'm sure the a/c people will track all kinds of stuff in from the attic that I'll get to clean up.

On with the pictures!

A view of the back of the house...

New flooring, paint, and blinds int he laundry room.

Another shot of the new... everything in the laundry room.

Updated view of the front of the house. I wanted the vent at the top/center of the house to be maroon, but didn't notice that it was white until just now. Guess it wasn't that big of a detail after all. The view has changed since I took this picture because the bushes are now gone. A long time ago when this was a bad neighborhood people planted bushes next to the sidewalk, kind of as a way to fence in their yard without actually having to build a fence. It doesn't look very good and I'm replacing them with small, normal landscaping next to the porch.

More shots of the bathroom. They probably would've come out better if the lights were on.

Again, the bathroom...

Completed view of the vanity area.

Here is where I need to replace the missing bricks. I already dug out a trench to fill with concrete, so the bricks I put in there should be able to stay where they belong. Who knows where the ones that were there went...